Nothing beats a bowl of creamy, hot chili when you want good food. Olga’s white bean chicken chili recipe tops my list of favorite meals to make. It all started when I ate at Olga’s Kitchen restaurant. Their white chicken chili tasted so good – full of tender chicken pieces, soft white beans, and just the right mix of spices.
The taste stayed with me, and I wanted to make it at home. After much cooking and testing in my kitchen, I found the perfect mix of ingredients. The white beans make this chili special. They cook down to make the chili creamy and smooth without adding too much cream. When mixed with melted Monterey Jack cheese and spices like cumin and chili powder, each spoonful tastes amazing.
The best thing about this chili? It works for any meal. Make it for dinner on busy days, or cook it when friends come over. It tastes great simple or dressed up with toppings like cheese, sour cream, or green onions. Even better – it’s easy to make. Just follow the steps, and you’ll have a pot of warm, tasty chili that everyone will love.
My Favorite White Chicken Chili—Here’s Why
This isn’t your regular chili – it’s better! The white beans make it creamy and smooth, while the green chilies add just the right kick without being too hot. I make this at least twice a month because it’s so good and my kids love it too. The chicken makes it filling, but it doesn’t sit heavy in your stomach like regular red chili sometimes can.
What Makes This White Chicken Chili Creamy?
The secret to the creamy texture in this white chicken chili comes from a combination of milk and cheese. Using a roux made from butter and flour, followed by the addition of chicken broth and whole milk, creates a smooth base. Then, stirring in Monterey Jack cheese at the end gives it that luxurious, creamy finish that makes this chili irresistible.

What’s in Olga’s White Bean Chicken Chili Recipe?
To make this flavorful white bean chicken chili, you’ll need the following ingredients:
- 1 lb boneless, skinless chicken breasts, thinly sliced
- 2 (15 oz) cans cannellini beans, drained and rinsed
- 1 (4 oz) can diced green chili peppers
- 1 large white onion, diced
- 4 tablespoons unsalted butter
- 1/4 cup all-purpose flour
- 2 cups chicken broth
- 2 cups whole milk
- 2 teaspoons garlic salt
- 1 teaspoon chili powder
- 1 teaspoon cumin
- 1 teaspoon onion salt
- 1/2 teaspoon black pepper
- 1 cup shredded Monterey Jack cheese
Recipe Substitutions
- Chicken Breasts: For a quicker version, you can use shredded rotisserie chicken.
- Milk: For a dairy-free option, swap the whole milk with almond or oat milk.
- Monterey Jack Cheese: Try mozzarella for a milder flavor or use a dairy-free cheese for a vegan option.
- Cannellini Beans: If you can’t find cannellini beans, navy or Great Northern beans will work just as well.
Kitchen Appliances You’ll Need
- Cutting board and knife: For chopping the chicken and onions.
- Large pot or Dutch oven: To cook and simmer the chili.
- Wooden spoon or spatula: For stirring.
- Ladle: To serve the chili into bowls.
- Can opener: For opening the cans of beans and chili peppers.
How to Make Olga’s White Bean Chicken Chili
Here’s how you can make this cozy and creamy white bean chicken chili at home:
Step 1 | Prepare the Chicken
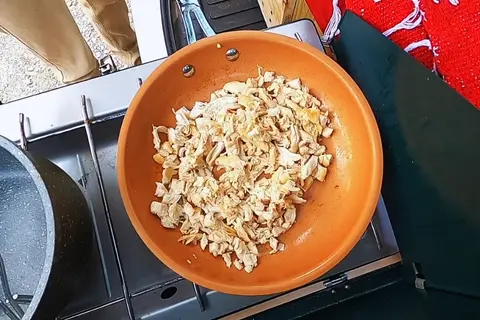
In a large pan, melt 2 tablespoons of butter over medium heat. Add the thinly sliced chicken breasts and cook until browned, about 5-7 minutes. Let it cool, then shred it with forks.
Step 2 | Sauté Onions
In a large pot or Dutch oven, melt the butter over medium heat. Add the diced onion and garlic salt, and sauté until the onions are translucent, about 5 minutes.

Step 3 | Make the Roux
Sprinkle in the flour and whisk constantly for 2-3 minutes to create a roux.

Step 4 | Add Broth and Milk
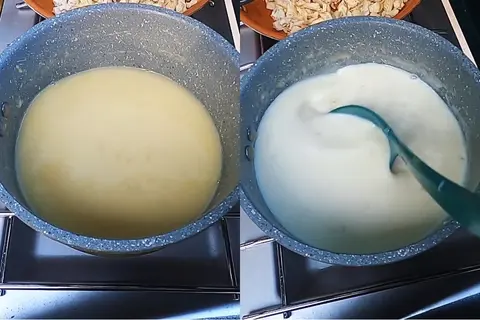
Slowly pour in the chicken broth, whisking continuously to avoid lumps. Bring the mixture to a simmer and let it thicken for about 5 minutes. Then, stir in the milk and simmer for another 10-15 minutes, stirring occasionally.
Step 5 | Add Beans and Chili Peppers
Next, add the shredded chicken, cannellini beans, and diced green chili peppers. Season with chili powder, cumin, onion salt, black pepper, and salt to taste. Let everything simmer together for 20-30 minutes, allowing the flavors to blend perfectly.

Step 6 | Final Touch with Cheese
Just before serving, stir in the shredded Monterey Jack cheese until it melts into the chili, giving it a creamy and rich texture. Now, it’s ready to serve!

Tips for Success
- Whisk the Roux: When adding broth to the roux, keep whisking to prevent any lumps from forming.
- Simmer for Flavor: Letting the chili simmer for 20-30 minutes ensures that all the flavors meld together beautifully. If you can, simmer longer for even richer flavor!
- Make Ahead for Camping: If you’re camping, prep the ingredients ahead of time and store them in sealed bags for easy cooking at the campsite.
Recipe Variations & Additions
This chili is so versatile! Here are a few ways you can switch it up:
- Add more veggies: Try adding corn, bell peppers, or even spinach for an extra nutritional boost.
- Spice it up: For those who love a kick, add some cayenne pepper or extra green chilies to the mix.
- Top it off: Serve with crushed tortilla chips, a dollop of sour cream, or a sprinkle of fresh cilantro for added texture and flavor.
How to Serve Creamy White Chicken Chili
This white bean chicken chili is delicious on its own, but here are a few serving ideas to make it even better:
- Serve with warm, crusty bread or garlic toast on the side to soak up the creamy broth.
- Garnish with fresh herbs like cilantro or parsley for a pop of color.
- Pair with a light side salad for a complete meal.
- Add a squeeze of lime juice to brighten up the flavors.
How to Store Creamy White Chicken Chili
If you have leftovers (lucky you!), here’s how to store them:
Refrigerator: Store the chili in an airtight container for up to 4 days.
Freezer: This chili freezes well! Let it cool completely, then transfer it to a freezer-safe container. It will keep for up to 3 months.
To reheat, thaw it in the refrigerator overnight and warm it on the stove or in the microwave.
Olga’s White Bean Chicken Chili Recipe FAQs
1. Can I make this chili ahead of time?
Yes! This chili actually tastes even better the next day. Make it up to 2 days ahead and keep it in the fridge. When you’re ready to eat, heat it slowly on the stove, stirring now and then. Add a little milk or broth if it seems too thick.
2. Is this chili spicy?
No, this version is mild and kid-friendly. The green chilies add flavor but not much heat. If you want it spicier, add more chili powder or a diced jalapeño with the seeds removed.
3. Can I make this in a slow cooker?
Yes! Cook the chicken and make the roux on the stove first. Then put everything in the slow cooker and cook on low for 4-6 hours. Add the cheese during the last 30 minutes.
4. Why did my chili turn out too thin?
The key is cooking the flour and butter long enough at the start. If it’s still too thin, let it simmer longer with the lid off, or make a little more roux in a separate pan and stir it in.
5. Can I use dried beans instead of canned?
Yes, but soak and cook them first. One can of beans equals about 1 1/2 cups of cooked dried beans. Make sure they’re soft before adding them to the chili.
6. What’s the best way to shred the chicken?
Let the cooked chicken cool a bit, then use two forks to pull it apart. You can also cut it into small pieces with a knife if you prefer.
7. How do I keep the cheese from clumping?
Take the pot off the heat before adding the cheese. Stir it in gradually, and the residual heat will melt it smoothly.
8. Can I double the recipe?
Yes! Just make sure your pot is big enough. Double all ingredients and add a little extra cooking time.
[mv_create key=”38″ thumbnail=”https://winkrecipe.com/wp-content/uploads/2024/11/Olgas-White-Bean-Chicken-Chili-Recipe.jpg” title=”Olga’s White Bean Chicken Chili Recipe” type=”recipe”]
Time to Get Cooking!
I really hope you try this Olga’s white bean chicken chili recipe! It’s become such a favorite in my kitchen, and I know you’ll love how easy it is to make. The creamy, warm bowls of chili are perfect for cold days or anytime you want something filling and tasty. Remember to start with the roux – that’s the secret to getting that perfect creamy texture!
I’d love to hear how yours comes out – share your cooking experience in comment box when you make it! Follow me on Pinterest for more easy, tasty recipes like this one. Happy cooking!

